

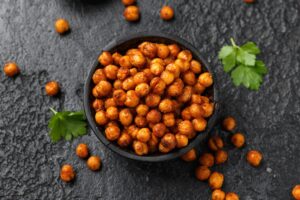
It’s remarkably pleasing when a snack comes together so easily yet tastes far superior to most store-bought chips. Roasted chickpeas hit that sweet spot. They’re golden, crunchy, and infinitely customizable.
They’re versatile enough to fit into a huge variety of diets and lifestyles. And just one can of chickpeas, along with a few common pantry items, is all that’s required to whip them up.
How to Roast Chickpeas
Learning how to roast chickpeas well has less to do with what gear you have and more to do with how you handle them. The real make-or-break moments happen before they ever go in the oven, because a couple of small choices early on decide if they come out properly crisp or end up merely chewy.
Drying the Chickpeas for Maximum Crispiness
Moisture is the enemy of crispy chickpeas. Once you drain and rinse a can of chickpeas, spread them out on a clean kitchen towel (or several layers of paper towels). Carefully roll the chickpeas around in the towels to blot away surface moisture.
This also removes any loose skin. Throw away the skins because they’ll inhibit crispiness. Leaving the chickpeas to air dry on the towels for 15-20 minutes before baking yields better results.
Oven Temperature and Timing
The roasting temperature is usually 400°F (200°C). Spread the chickpeas in one layer on a large rimmed baking sheet. Ensure there is enough space between them so that hot air can flow freely around each chickpea.
If they are crowded together on the pan, they will steam rather than roast. Steam softens the chickpeas while roasting crisps them up. Expect the total oven time to be 20 to 35 minutes.
Toss the pan every 10 minutes to ensure both sides brown evenly. For crunchier chickpeas, many home cooks will turn off the oven after roasting is complete, then leave the chickpeas in the oven while it cools for an additional 30 minutes to 1 hour.
Storing and Serving
Roasted chickpeas are crispiest during the first hour or two out of the oven. Store them in a jar or other container, loosely covered or left partially open, at room temperature. A sealed container will cause them to become chewy very quickly.
Stored this way, they will last three to four days. A few minutes in a 300-400° oven will restore most of the crunch. They can also be used as a salad topping, sprinkled on soup instead of croutons, or as a finisher for grain bowls.
The Use of Extra Virgin Olive Oil from Spain
In this recipe, oil does more than sit in the pan. It’s what drives the chickpeas to brown the way they should, helps the spices cling rather than slide off, and has a real say in how crisp, rich, or tender the final bite turns out to be.
Why EVOO Works Best
Use regular olive oil on roasted chickpeas. It has a high enough smoke point to survive in a 400° oven without burning, plus a subtle flavor that won’t clash with most spice mixes. Extra-virgin olive oil has a lower smoke point and a stronger flavor, so it’s better for finishing or salads than roasting.
For those at home wanting a neutral-tasting oil, avocado oil is another solid pick. Either way, the oil helps the chickpeas get evenly coated and provides them with a base to crisp up against.
How Much Extra Virgin Olive Oil to Use
Most cooks agree that 1 tablespoon of olive oil per 15-ounce can of chickpeas is about right. Surprisingly, precisely measuring your oil proves more crucial than many home cooks realize. Overdoing the oil results in chickpeas that are soft and greasy, missing the desired crunch.
Adding too little will cause uneven browning and an overall blotchy appearance. Some cooks first dry-roast their chickpeas with no oil, then toss them with olive oil and seasoning immediately after removing them from the oven. This allows the chickpeas to fully dehydrate in the oven, while still coating them with oil and seasoning at the end.
Ingredients
This is a simple, crispy chickpeas recipe with a few ingredients. The base is kept to a minimum to allow for creativity during seasoning.
Core Ingredients
The key ingredients are a can or two of chickpeas (15-ounce size), one tablespoon of extra virgin olive oil from Spain, and one or 1.5 teaspoons of sea salt. Salt should always be added at the end of roasting, not the beginning.
Adding salt too early pulls moisture out, hindering crispness. When using dried chickpeas, a 24-hour soak until they’ve doubled in size makes them a suitable alternative to canned chickpeas for this recipe. Then simply dry and roast.
Spice Blends and Seasoning Variations
Spices should always be added after roasting because most of the spices turn bitter and burn if applied before roasting at high oven temperatures. After being baked, chickpeas can be tossed with almost any flavor. Some good choices to make are:
- For a classic savory combination, add smoked paprika, garlic powder, ground cumin, and black pepper.
- Add sumac, smoked paprika, and garlic powder for a Mediterranean influence.
- Cumin, cayenne, and chili powder for a hint of spice and fire.
- Nutritional yeast and garlic powder to give a cheesy flavor (dairy-free)
- Everything bagel seasoning is a quick, intense flavor bagel seasoning that requires little preparation.
The Snack That Earns Its Place
Roasted chickpeas are one of those snacks you make once and then want to make every week. They’re easy to throw together, there’s not much clean up, and they stay crispy for days. Learning how to roast chickpeas is all about drying them properly, giving them space in the oven, and waiting to add seasonings until after baking.
This crispy chickpeas recipe can be riffed in dozens of ways from there, since the base stays consistent no matter what spices or flavors you use.








0 Comments